linux - 使用 ired 搭建mail server 邮件服务器 roundcube 2024.11更新
访问量: 2242
参考: https://github.com/iredmail/iRedMail/releases/
注意: 2024.11: 使用 ubuntu24, 4G内存
然后按照说明,一路安装就行. 这个iredmail 特别方便. 下面是安装过程:
0. 需要一个干净的ubuntu 22. 4G内存.
再到阿里云上申请一个免费的SSL证书,针对 mail.yourdomain.io (5分钟可以搞定)
1. $ sudo apt update
$ sudo apt upgrade
$ sudo hostnamectl set-hostname mail.yourdomain.io
$ hostname mail.yourdomain.io , 然后通过 hostname -f 来确认, 是否是 mail.xx.io (非常重要)
/etc/hosts: 第一行: 127.0.0.1 mail.your-domain.com localhost (注意要把mail.xx 放在127.0.0.1 后面)
/etc/hostname : 只保留一行: mail.your-domain.com
2. 设置域名的 MX记录和 A记录.
https://docs.iredmail.org/setup.dns.html#dmarc
Record Type Name Value
MX @ mail.your-domain.com (这一步在阿里云上可能会设置失败, 会跟 CNAME的@记录冲突. 所以,使用 URL来转发 @网址(参考: https://help.aliyun.com/knowledge_detail/39787.html)
A mail 172.105.68.64 1 Hour
3. 获得压缩文件:
来这里: https://github.com/iredmail/iRedMail/releases/
wget https://github.com/iredmail/iRedMail/archive/1.7.1.tar.gz
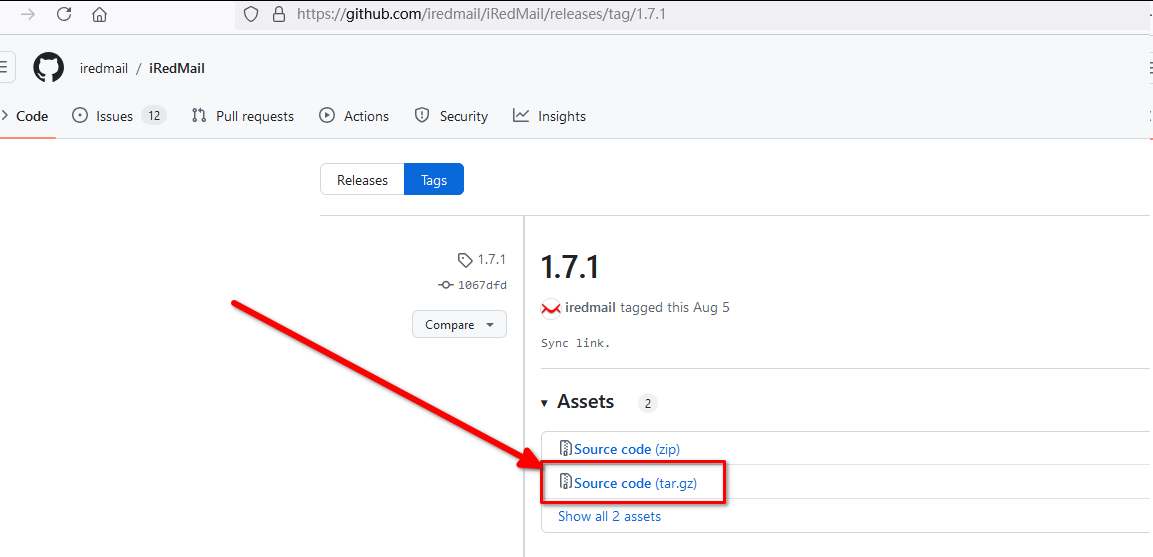
tar zxvf 1.7.1.tar.gz
cd iRedMail1.7.1
chmod +x iRedMail.sh
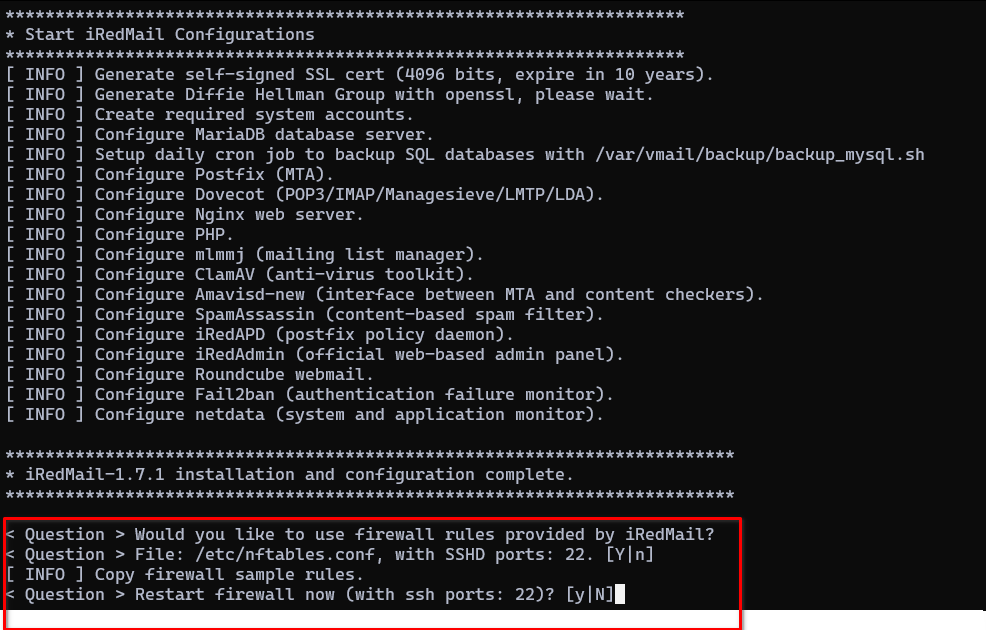
sudo bash iRedMail.sh
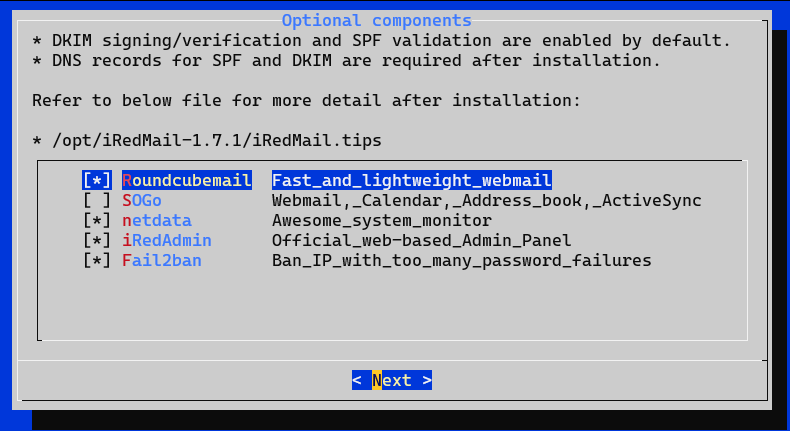
下面是一路的截图:
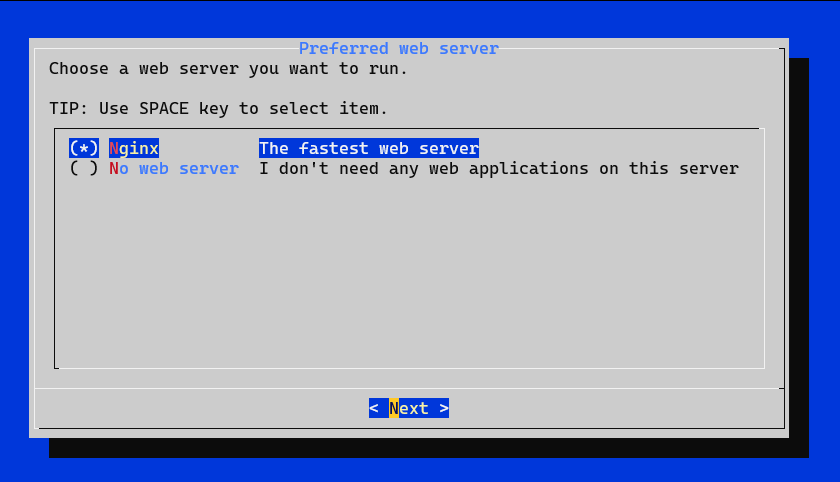
选择nginx:
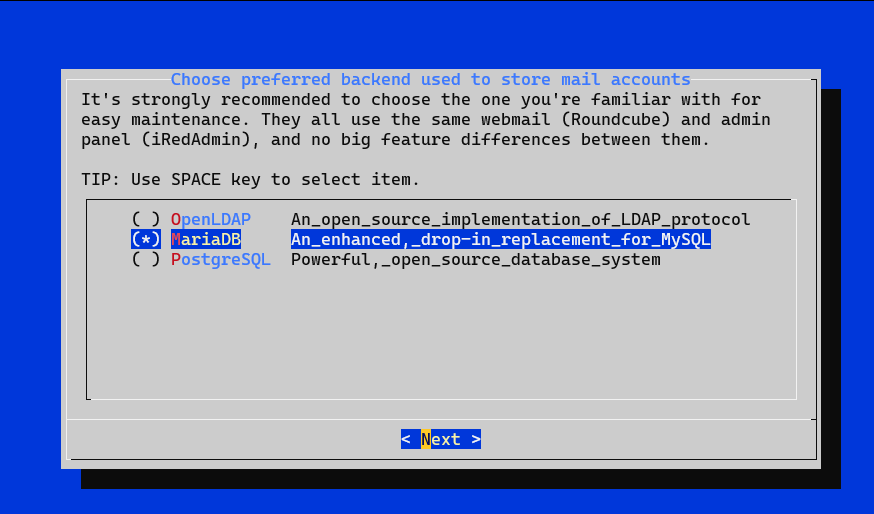
下一步.第三个选择(默认open ldap页面)选择maria DB (见上面的原文链接)
有个地方需要 输入 不带二级域名的域名, 例如 yourdomain.com 而不是 mail.yourdomain.com
(图忘记截了)
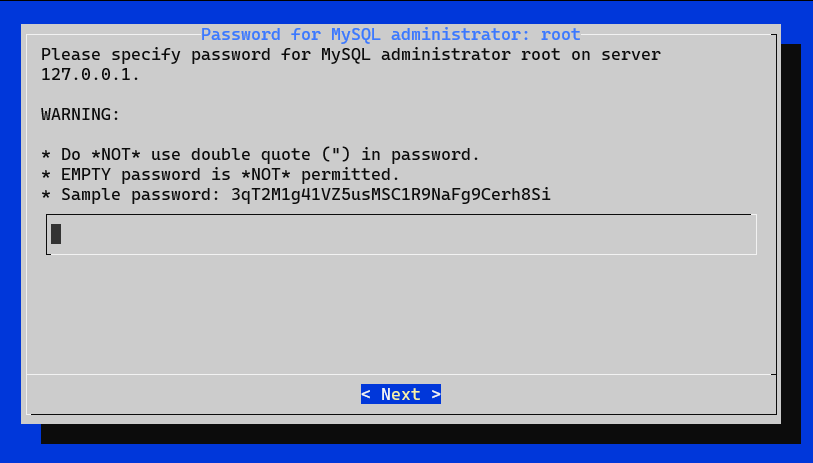
然后输入mysql 密码.
设置postmaster的密码: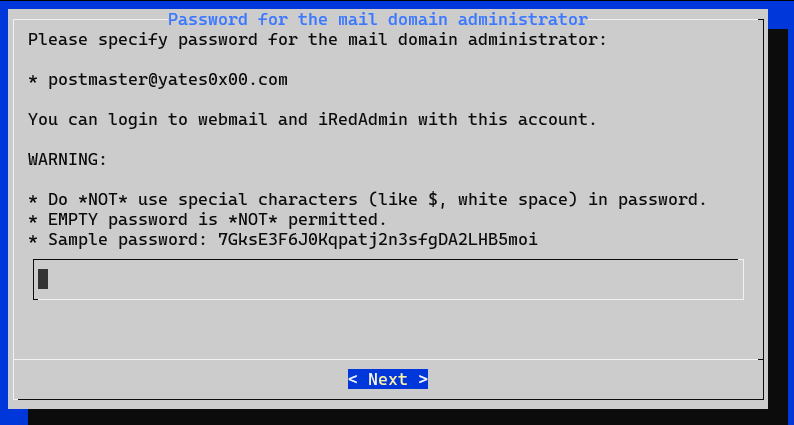
安装好之后, 还要根据说明,设置一些属性 ,
然后确认安装:
*************************************************************************
***************************** WARNING ***********************************
*************************************************************************
* *
* Below file contains sensitive infomation (username/password), please *
* do remember to *MOVE* it to a safe place after installation. *
* *
* * /opt/iRedMail-1.7.1/config
* *
*************************************************************************
********************** Review your settings *****************************
*************************************************************************
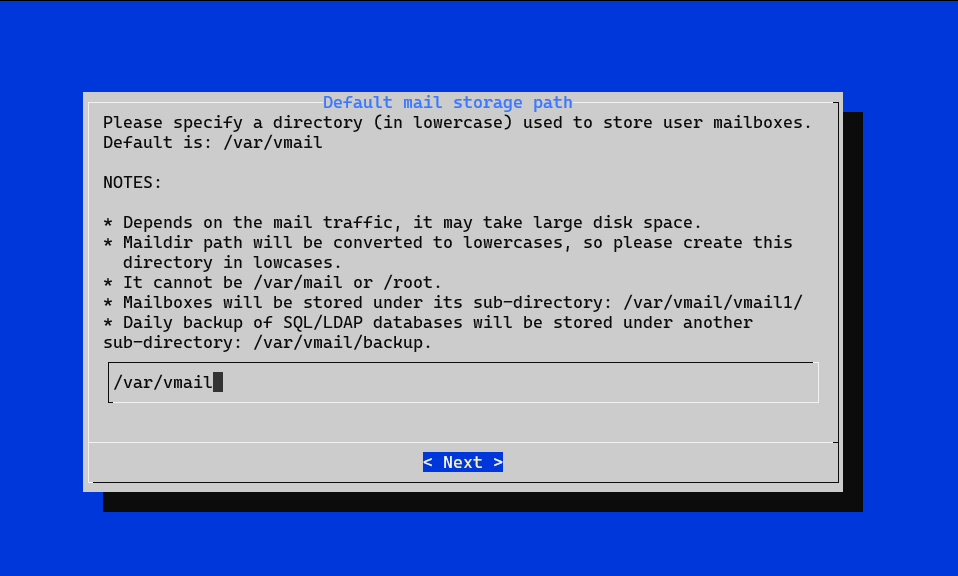
* Storage base directory: /var/vmail
* Mailboxes:
* Daily backup of SQL/LDAP databases:
* Store mail accounts in: MariaDB
* Web server: Nginx
* First mail domain name: xxxx.com
* Mail domain admin: postmaster@xxxx.com
* Additional components: Roundcubemail netdata iRedAdmin Fail2ban
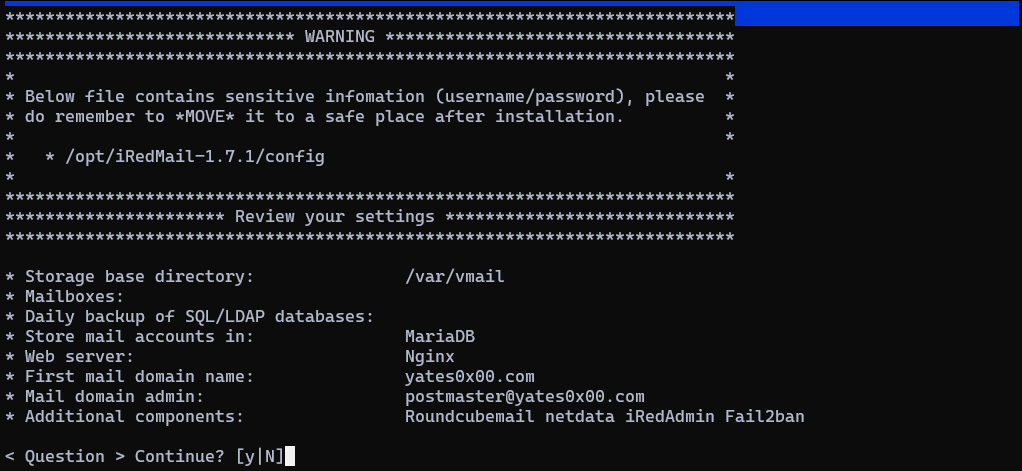
接下来就是安装后的提示, 很重要.
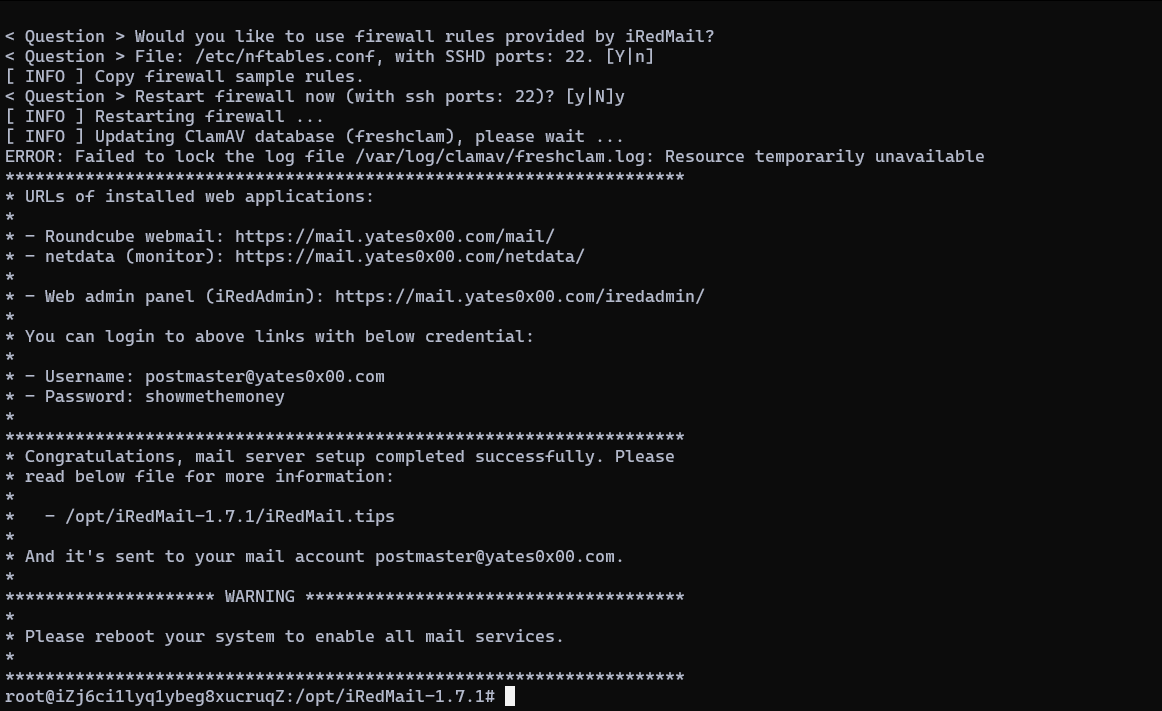
(如果是linode上的云服务器,是这样做的. 如何在阿里云上设置 PTR ,需要百度) 还需要增加 PTR domain , 这个需要到你的VPS供应商那里设置, 例如 linode , 就是进入到 node -> remote access -> reverse dns -> hostname -> 填写后(例如 mail.siwei.me) 然后 lookup , 发现可用后,点击确定,就可以了. 大约 24h 以内才会生效.
验证: host 224.224.33.55 或者 dig -x 22.33.44.55 +short
3. (安装过程中, ired会给出提示.
如果没有也不要紧, 最下面有个 mail-tester.com , 也会给我们提示) 还需要增加SPF(Sender Policy Framework) 标记, 有了这个标记,才不是垃圾邮件. 也就是域名的TXT记录.
TXT domain, TXT @ v=spf1 mx ~all
对于 godaddy 来说, 这个东东可以增加多条, 综合不超过500个字节就行. 可以使用 $ dig xx.com txt 来查看.
4. 增加 DKIM 标记. 按照安装时给的提示去做就可以了.
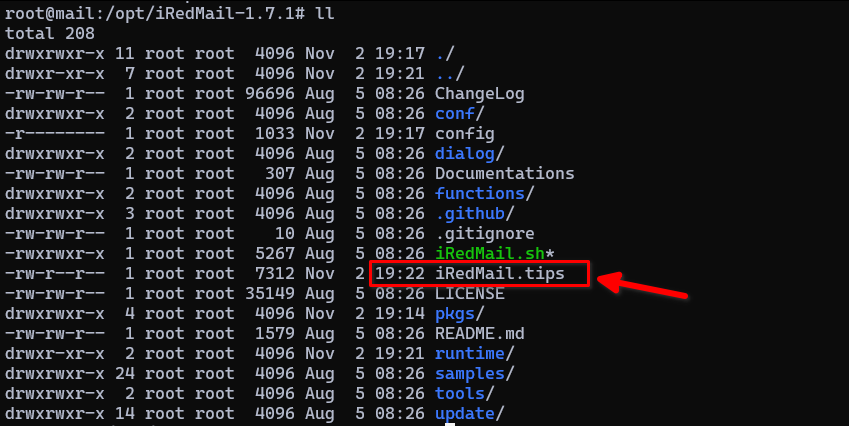
4.1 找到 ired 目录(root@mail:/opt/iRedMail-1.7.1#)
下,有个 iredxxx.tips , 里面就有 DKIM这个标记. 把它复制一下,
4.2 新增TXT记录: TXT dkim._domainkey ... 就可以了. 这个非常非常重要.
记得, 在上面的 iRedMail.tips中的内容是这样:
DNS record for DKIM support:

; key#1 2048 bits, i=dkim, d=xxx.io, /var/lib/dkim/xxx.io.pem
dkim._domainkey.xxx.io.       3600 TXT (
  "v=DKIM1; p="
  "MIIBIjANBgkqhkiG9w0BAQEFAAOCAQ8AMIIBCgKCAQEAnO6tMWozhzuAgsTvRTlW"
  "D7NkWF0uK29KnNNtbAN0Q8a/tuSg2UXOKXnf9W/QQGqTQKWD+E19gEU5+pfyxDYc"
  "KDXSssnRdQi8LnawRsNxyZ0Nu02qf+WCj/IWwhz3OtK0g/oupxUlrsANAi2Q+uwh"
  "TUgXcDFyara3XsAPU+mR5cKFL7X5wMTBtip2RkIA8JWlEVM0H95t1p/6LGwV6Gwb"
  "9UfgXsFwZinTnzK79zgtI0FuPZcRumuOwzUQF2inZmurn8vhodIoOOeYJKvVrqRb"
  "HqZeD0LJ/dMkkPS6yAGJ2qS2ADGTtzo/4xwGMcli+Cl+BkP5kKdRx7j+LrQHDhuo"
  "XQIDAQAB")
需要你把 3600 TXT() (注意这个括号) 中的字符串链接起来, 去掉空格, 去掉双引号, 例如:
v=DKIM1; p=MIIBIjANBgkqhkiG9w0BAQEFAAOCAQ8AMIIBCgKCAQEAnO6tMWozhzuAgsTvRTlWD7NkWF0uK29KnNNtbAN0Q8a/tuSg2UXOKXnf9W/QQGqTQKWD+E19gEU5+pfyxDYcXQIDAQAB
4.3 如何验证dkim ? 在iRedmail服务器运行这个命令:
root@mail:/opt/iRedMail-1.7.1# sudo amavisd-new testkeys
TESTING#1 y0x00.com: dkim._domainkey.y0x00.com => pass
4.4 如何验证后台程序已经运行了?
ps aux --sort rss 之后,会得到这样的结果: (可以看到有php 还有 uwsgi , 还有 clamd 这个后台进程)
iredadm+   894  0.0  0.4 138404  9796 ?        S    May08   0:00 /usr/bin/uwsgi --ini /opt/www/iredadmin/rc_scripts/uwsgi/debian.ini --pidfile /va
iredadm+   896  0.0  0.4 138404  9816 ?        S    May08   0:00 /usr/bin/uwsgi --ini /opt/www/iredadmin/rc_scripts/uwsgi/debian.ini --pidfile /va
iredadm+   897  0.0  0.4 138404  9816 ?        S    May08   0:00 /usr/bin/uwsgi --ini /opt/www/iredadmin/rc_scripts/uwsgi/debian.ini --pidfile /va
mlmmj      859  0.0  0.5 123756 11612 ?        S    May08   0:00 /usr/bin/uwsgi --ini /opt/mlmmjadmin/rc_scripts/uwsgi/debian.ini --pidfile /var/r
mlmmj      863  0.0  0.5 123756 11624 ?        S    May08   0:00 /usr/bin/uwsgi --ini /opt/mlmmjadmin/rc_scripts/uwsgi/debian.ini --pidfile /var/r
mlmmj      860  0.0  0.5 123756 11636 ?        S    May08   0:00 /usr/bin/uwsgi --ini /opt/mlmmjadmin/rc_scripts/uwsgi/debian.ini --pidfile /var/r
mlmmj      861  0.0  0.5 123756 11636 ?        S    May08   0:00 /usr/bin/uwsgi --ini /opt/mlmmjadmin/rc_scripts/uwsgi/debian.ini --pidfile /var/r
mlmmj      862  0.0  0.5 123756 11636 ?        S    May08   0:00 /usr/bin/uwsgi --ini /opt/mlmmjadmin/rc_scripts/uwsgi/debian.ini --pidfile /var/r
root       602  0.0  0.6 170392 13684 ?        Ssl  May08   0:00 /usr/bin/python3 /usr/bin/networkd-dispatcher --run-startup-triggers
www-data 16192  0.0  0.7 452248 16148 ?        S    00:44   0:00 php-fpm: pool inet
www-data 16194  0.0  0.7 452248 16148 ?        S    00:44   0:00 php-fpm: pool inet
www-data 16196  0.0  0.7 452248 16148 ?        S    00:44   0:00 php-fpm: pool inet
www-data 16197  0.0  0.7 452248 16148 ?        S    00:44   0:00 php-fpm: pool inet
www-data 16199  0.0  0.7 452248 16148 ?        S    00:44   0:00 php-fpm: pool inet
iredadm+   661  0.0  0.8 138404 16872 ?        Ss   May08   0:01 /usr/bin/uwsgi --ini /opt/www/iredadmin/rc_scripts/uwsgi/debian.ini --pidfile /va
root       679  0.0  0.8 187236 16892 ?        Ssl  May08   0:00 /usr/bin/python3 /usr/share/unattended-upgrades/unattended-upgrade-shutdown --wai
netdata   2098  0.1  0.8 125184 17292 ?        SNl  May08   0:56 /opt/netdata/usr/libexec/netdata/plugins.d/go.d.plugin 3
mlmmj      660  0.0  0.9 123756 19084 ?        Ss   May08   0:01 /usr/bin/uwsgi --ini /opt/mlmmjadmin/rc_scripts/uwsgi/debian.ini --pidfile /var/r
root       642  0.1  1.0 711884 22072 ?        Ssl  May08   0:53 /usr/bin/python3 /usr/bin/fail2ban-server -xf start
root       600  0.0  1.1 449576 24080 ?        Ss   May08   0:02 php-fpm: master process (/etc/php/7.2/fpm/php-fpm.conf)
root       401  0.0  1.2 153360 24684 ?        S  May08   0:01 /lib/systemd/systemd-journald
clamav     623  0.0  1.3 234368 27364 ?        Ss   May08   0:00 /usr/bin/freshclam -d --foreground=true
netdata   2096  0.0  1.3 101864 28200 ?        SNl  May08   0:32 /usr/bin/python /opt/netdata/usr/libexec/netdata/plugins.d/python.d.plugin 3
www-data 15050  0.0  1.4 455164 29224 ?        S    00:21   0:00 php-fpm: pool inet
www-data 15323  0.0  1.5 455412 30984 ?        S    00:24   0:00 php-fpm: pool inet
iredapd   1096  0.0  1.5 101528 31420 ?        S    May08   0:00 /usr/bin/python2 /opt/iredapd/iredapd.py
iredadm+   895  0.0  1.6 152964 33136 ?        S    May08   0:01 /usr/bin/uwsgi --ini /opt/www/iredadmin/rc_scripts/uwsgi/debian.ini --pidfile /va
iredadm+   898  0.0  1.7 165312 36716 ?        S    May08   0:04 /usr/bin/uwsgi --ini /opt/www/iredadmin/rc_scripts/uwsgi/debian.ini --pidfile /va
netdata   1964  0.4  3.6 134152 75292 ?        SNsl May08   2:20 /opt/netdata/bin/srv/netdata -P /opt/netdata/var/run/netdata/netdata.pid -D
mysql      833  0.2  5.2 669204 106308 ?       Ssl  May08   1:21 /usr/sbin/mysqld
amavis    1402  0.0  6.2 269756 126876 ?       Ss   May08   0:02 /usr/sbin/amavisd-new (master)
amavis    2253  0.0  6.4 271584 131828 ?       S    May08   0:01 /usr/sbin/amavisd-new (ch8-avail)
amavis    2252  0.0  6.5 272592 133040 ?       S    May08   0:01 /usr/sbin/amavisd-new (ch9-avail)
clamav     648  0.0 47.4 1282736 968180 ?      Ssl  May08   0:24 /usr/sbin/clamd --foreground=true
5. 配置ssl证书(这个非常重要, 不能用普通的80 端口登录)
先配置好nginx. (如果是从阿里云上下载的ssl 证书,现在应该一个是 .pem ,另一个是 .key文件。
绑定域名后(就是增加一个txt记录) , 大约10分钟左右证书就可以下来,然后下载对应的nginx的证书文件)
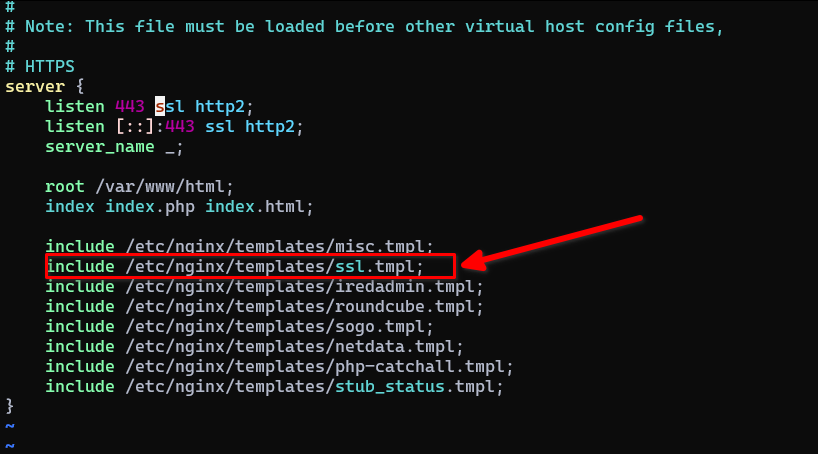
5.1 进入到ssl站点的配置文件: /etc/nginx/sites-enabled/00-default-ssl.conf ,
5.2 可以看到,内容配置在 /etc/nginx/templates/ssl.tmpl 中:
ssl_certificate /opt/3884958_mail.xxx.io.pem;
ssl_certificate_key /opt/3884958_mail.xxx.io.key;
重启nginx : nginx -s stop, nginx
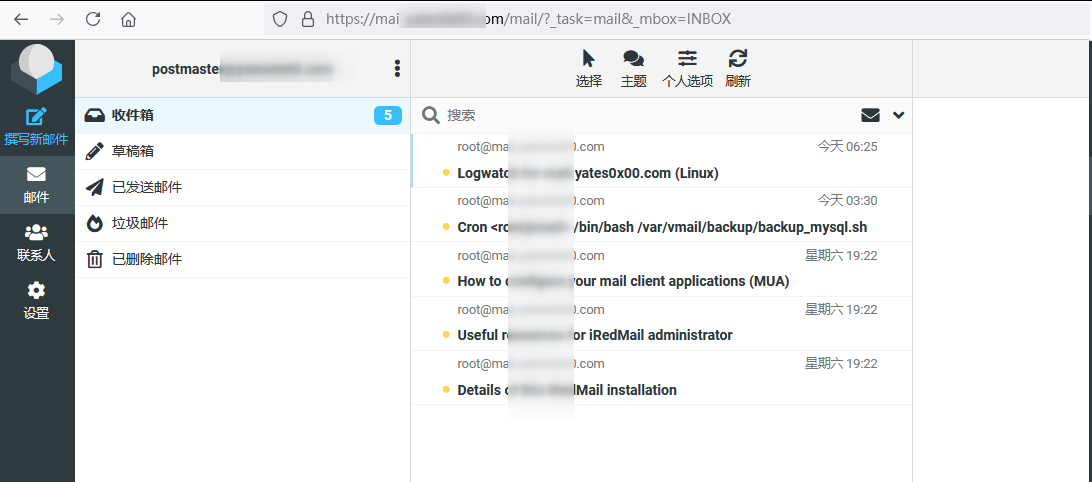
6. 登录方式: (记得都是https协议的)
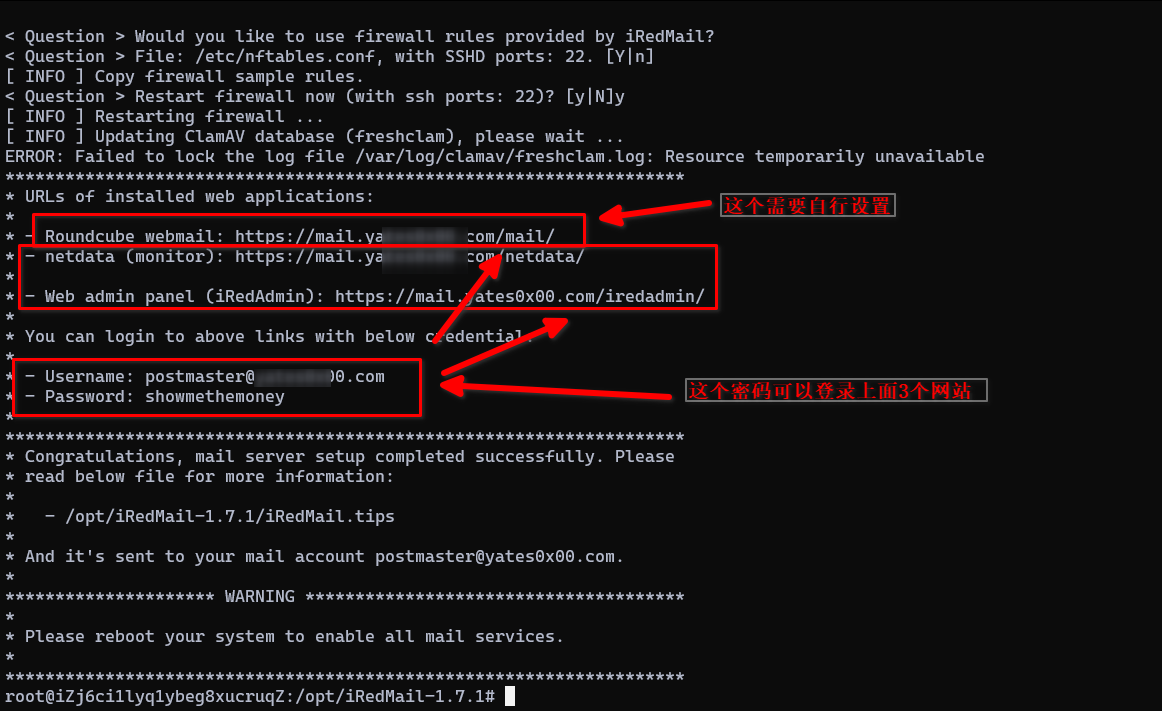
6.1 普通用户: mail.xxx.io
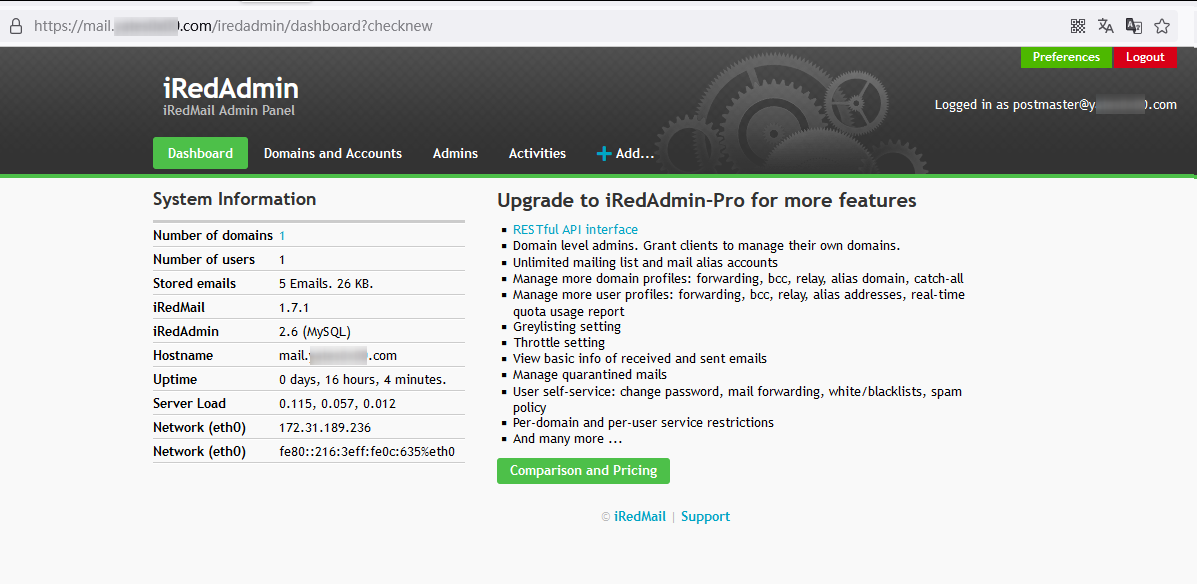
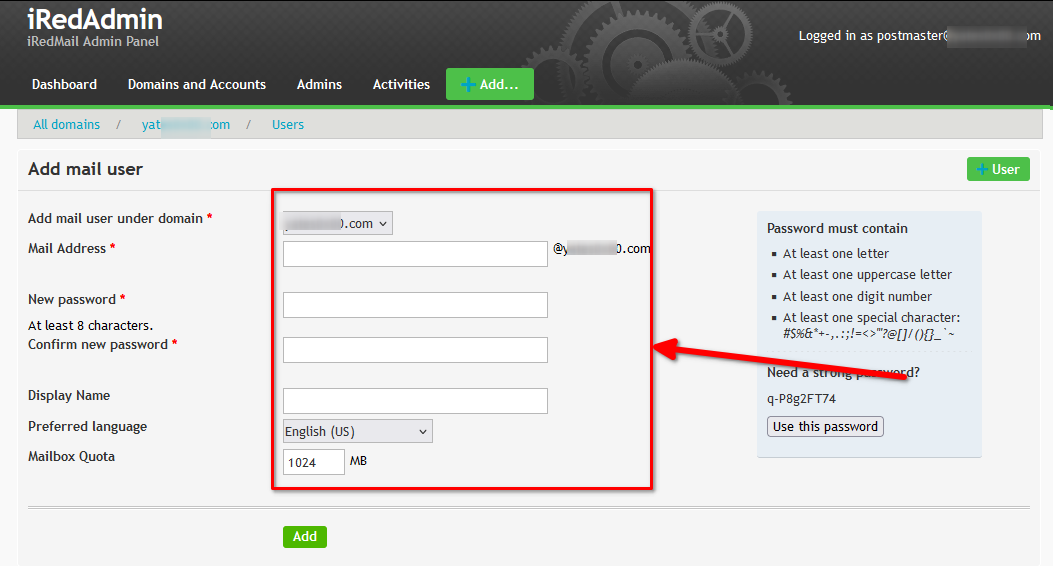
6.2 管理员用户: mail.xxx.io/iredadmin 用户名: postmaster@y0x00.com 密码:见上面
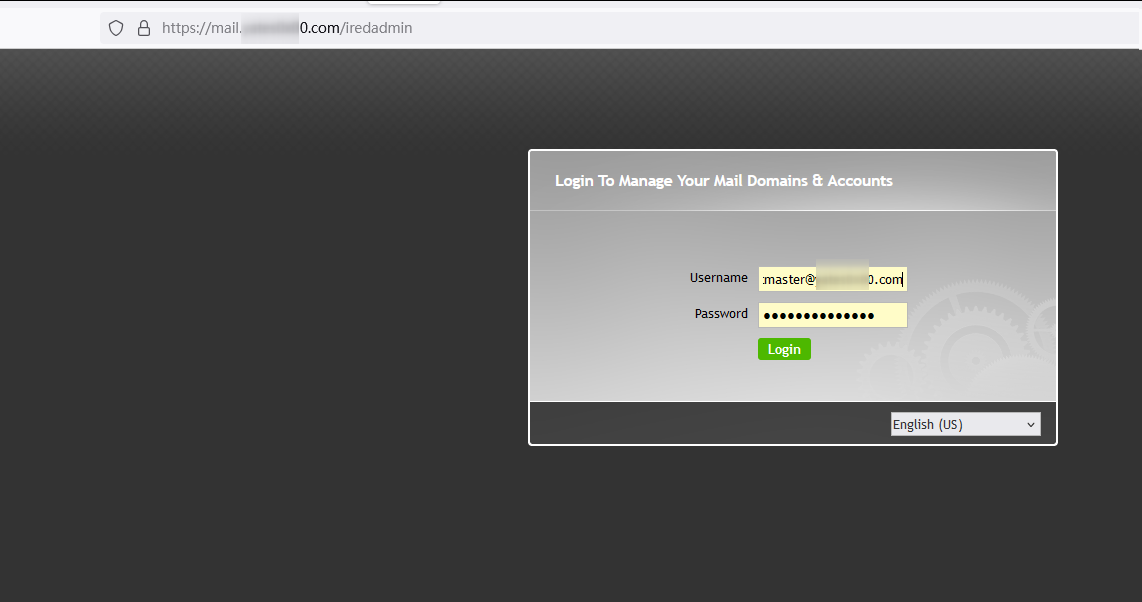
进入到对应域名:
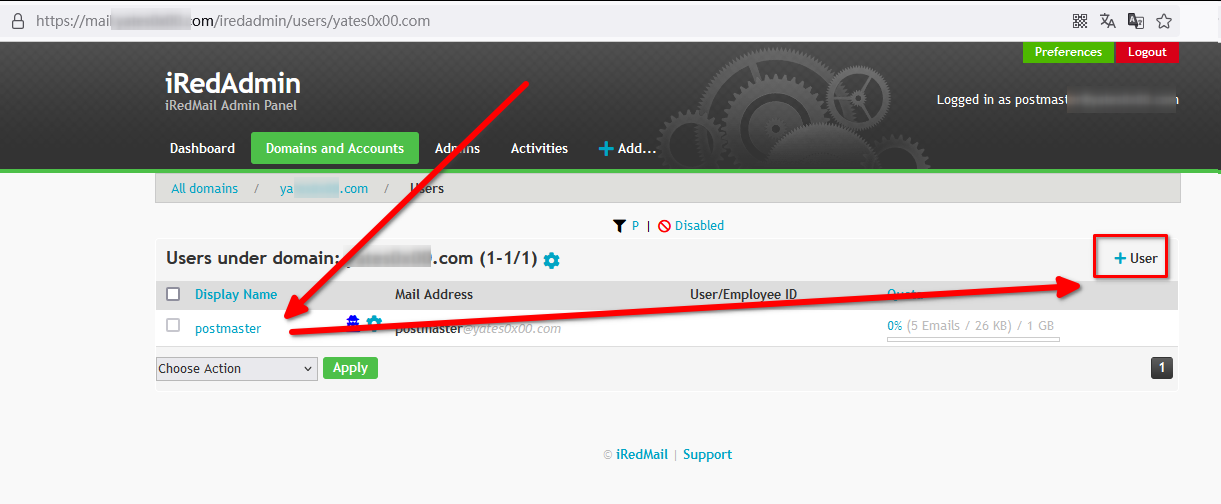
按照这个填好即可:
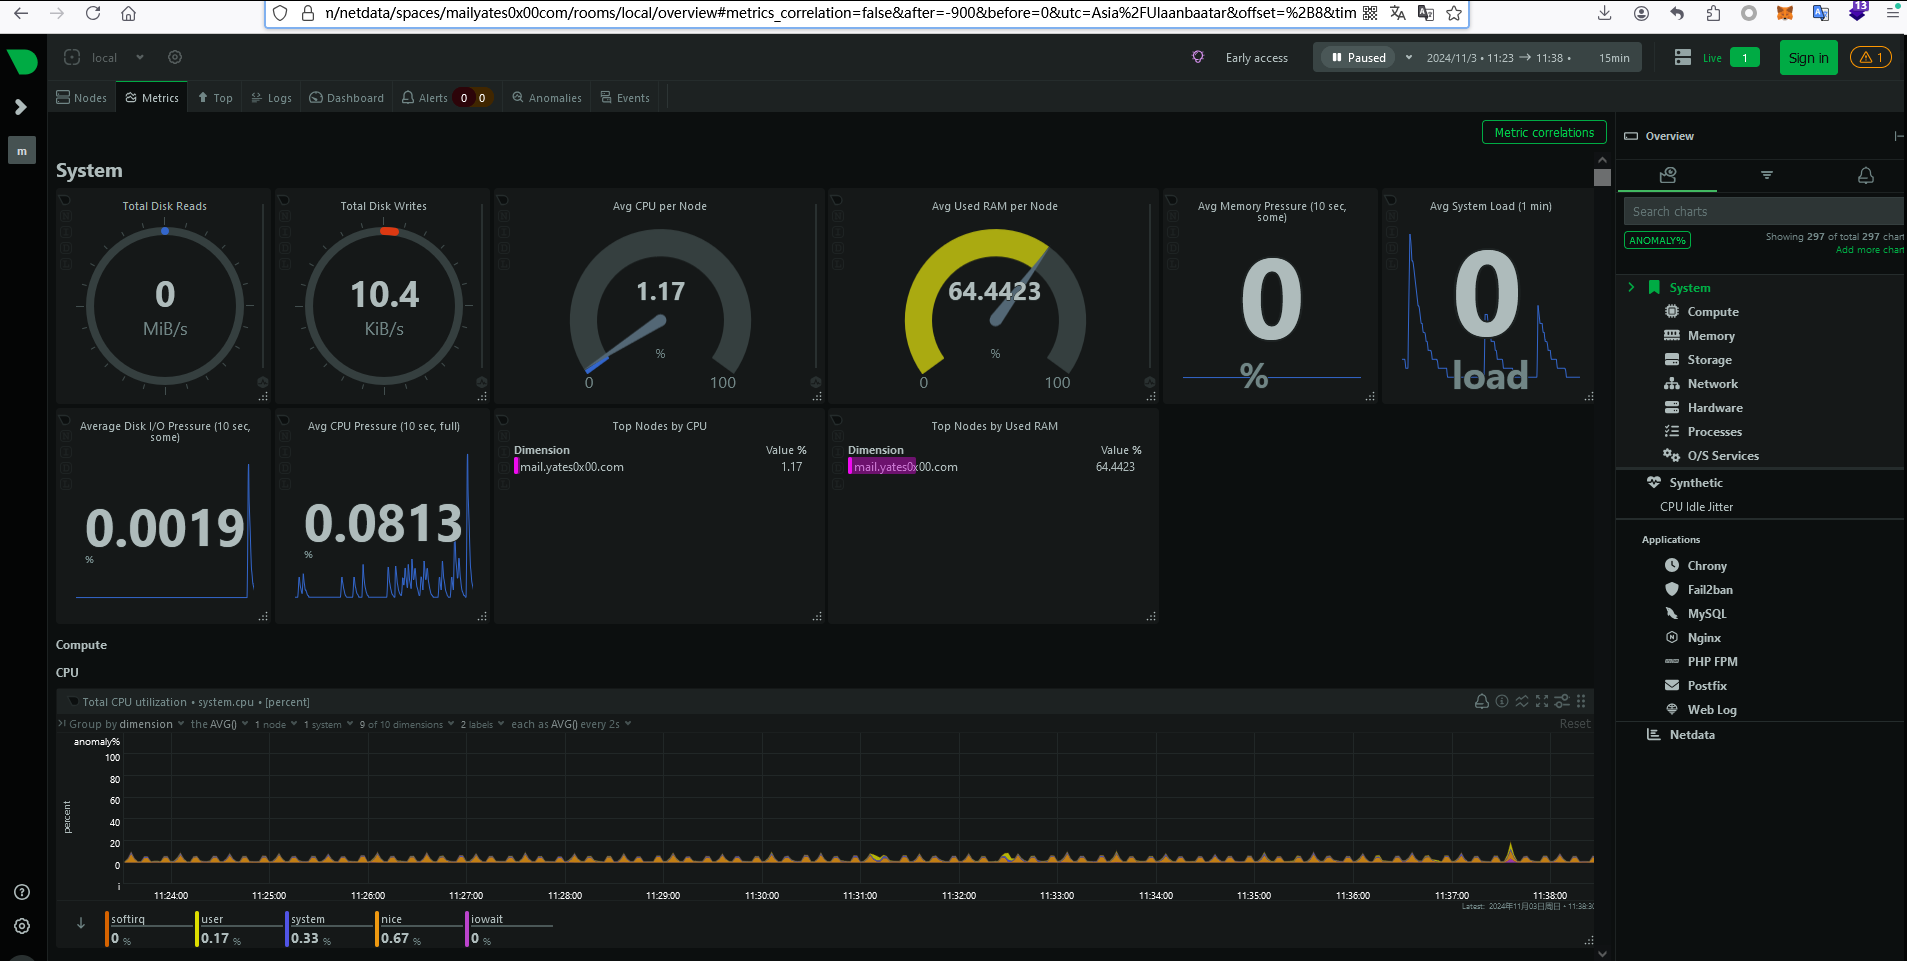
6.3 查看网站服务: mail.xxx.io/netdata 用户名: postmaster@y0x00.com 密码:见上面
默认语言是英文, 可以在 管理员后台进行设置。
也可以开通新用户。 设置用户的密码等。
建议用户使用SMTP的方式收发邮件, 同时邮件不要保存在服务器端,在本地客户端保存好邮件。
包含了密码的邮件务必删掉, 或者及时更改密码。
7. 增加邮件的健康度
都做完之后,来这里测试你的邮件得分:https://www.mail-tester.com/ 每天3封免费的.
也就是向他发送一封邮件~ 就知道你的邮件哪里不健康了.

7. 去掉 垃圾邮箱 参考 http://siwei.me/blog/posts/mail-roundcube-grey-list
我们 会发现,接受 sina, qq 等邮件会很慢, 有30分钟的延迟.
通过查看 日志发现, (/var/log/mail.log) , 是被反垃圾插件给屏蔽掉了.
解决办法:
1. 修改 /opt/iredapd/settings.py ,
plugins = [... ] 中,去掉 greylisting
2. 重启 : $ sudo service iredapd restart
就可以了.
如何调试:
1. 查看发送和接受邮件的日志进入到: /var/log/mail.log , 就可以看到各种日志了。
发送成功的日志:
Oct 25 10:32:05 mail postfix/submission/smtpd[27469]: connect from mail.siwei.me[127.0.0.1]
Oct 25 10:32:05 mail postfix/submission/smtpd[27469]: Anonymous TLS connection established from mail.siwei.me[127.0.0.1]: TLSv1.2 with cipher ECDHE-RSA-AES128-GCM-SHA256 (128/128 bits)
Oct 25 10:32:05 mail postfix/submission/smtpd[27469]: 725035FDE6: client=mail.siwei.me[127.0.0.1], sasl_method=LOGIN, sasl_username=info@siwei.me
Oct 25 10:32:05 mail postfix/cleanup[27475]: 725035FDE6: message-id=
Oct 25 10:32:05 mail postfix/qmgr[2077]: 725035FDE6: from=, size=61687, nrcpt=1 (queue active)
Oct 25 10:32:05 mail roundcube:  User info@siwei.me [88.88.180.76]; Message for content@mytoken.io; 250: 2.0.0 Ok: queued as 725035FDE6
Oct 25 10:32:05 mail postfix/submission/smtpd[27469]: disconnect from mail.siwei.me[127.0.0.1] ehlo=2 starttls=1 auth=1 mail=1 rcpt=1 data=1 quit=1 commands=8
Oct 25 10:32:08 mail postfix/10025/smtpd[27492]: connect from mail.siwei.me[127.0.0.1]
Oct 25 10:32:08 mail postfix/10025/smtpd[27492]: D31255FF2D: client=mail.siwei.me[127.0.0.1]
Oct 25 10:32:08 mail postfix/cleanup[27475]: D31255FF2D: message-id=
Oct 25 10:32:08 mail postfix/qmgr[2077]: D31255FF2D: from=, size=62735, nrcpt=1 (queue active)
Oct 25 10:32:08 mail postfix/10025/smtpd[27492]: disconnect from mail.siwei.me[127.0.0.1] ehlo=1 mail=1 rcpt=1 data=1 quit=1 commands=5
Oct 25 10:32:08 mail amavis[24113]: (24113-06) Passed CLEAN {RelayedInternal}, ORIGINATING/MYNETS LOCAL [127.0.0.1]:47658  -> , Queue-ID: 725035FDE6, Message-ID: , mail_id: 9k9LeQ838xao, Hits: 1.838, size: 61687, queued_as: D31255FF2D, dkim_new=dkim:siwei.me, 3334 ms, Tests: [ALL_TRUSTED=-1,SUBJ_ALL_CAPS=1.625,TVD_RCVD_SINGLE=1.213]
Oct 25 10:32:08 mail postfix/amavis/smtp[27480]: 725035FDE6: to=, relay=127.0.0.1[127.0.0.1]:10026, delay=3.5, delays=0.09/0.05/0.01/3.3, dsn=2.0.0, status=sent (250 2.0.0 from MTA(smtp:[127.0.0.1]:10025): 250 2.0.0 Ok: queued as D31255FF2D)
Oct 25 10:32:08 mail postfix/qmgr[2077]: 725035FDE6: removed
Oct 25 10:32:10 mail postfix/smtp[27493]: Untrusted TLS connection established to mxbiz1.qq.com[203.205.147.218]:25: TLSv1.2 with cipher AES128-SHA256 (128/128 bits)
Oct 25 10:32:12 mail postfix/smtp[27493]: D31255FF2D: to=, relay=mxbiz1.qq.com[203.205.147.218]:25, delay=3.1, delays=0.02/0.05/1.4/1.6, dsn=2.0.0, status=sent (250 Ok: queued as )
Oct 25 10:32:12 mail postfix/cleanup[27475]: 1448E5FF2E: message-id=<20181025103212.1448E5FF2E@mail.siwei.me>
Oct 25 10:32:12 mail postfix/qmgr[2077]: 1448E5FF2E: from=<>, size=3757, nrcpt=1 (queue active)
Oct 25 10:32:12 mail postfix/bounce[27494]: D31255FF2D: sender delivery status notification: 1448E5FF2E
Oct 25 10:32:12 mail postfix/qmgr[2077]: D31255FF2D: removed
Oct 25 10:32:12 mail postfix/pipe[27501]: 1448E5FF2E: to=, relay=dovecot, delay=0.05, delays=0/0.01/0/0.03, dsn=2.0.0, status=sent (delivered via dovecot service)
Oct 25 10:32:12 mail postfix/qmgr[2077]: 1448E5FF2E: removed
发送失败的日志有很多情况。 QQ对于垃圾邮件检查的比较严格。 所以, 搭建好服务器之后, 务必需要发送3封邮件试试:
1. 发送到QQ邮箱 (如果这里,无论如何都收不到, 而且 , mail-tester.com 评分几乎是满分的话(例如9.8),
1.1 那么则说明, 你的云服务器IP已经进了QQ邮箱的黑名单了, 这个时候解决问题的办法,就是更换云服务器的IP )
1.2 QQ邮箱的企业邮箱, 是需要让对方先给你发个邮件, 建立了往来之后, 才能进一步发送.. 否则会出现 550 content deny
1.3 一开始的邮箱要养一养.
2. 发送到新浪 貌似没问题.
3. 发送到 163
大问题:
小问题:
关于域名记录的配置:
如果要在一个已经配置好的iredadmin(roundcube) 中,新增一个域名邮箱的话,就特别简单了。
1. 登录 mail.xxx.top/iredadmin 后台,创建域名和用户(略)
2. 新建下面这些域名的配置:
